The Art of Releasing Flavor
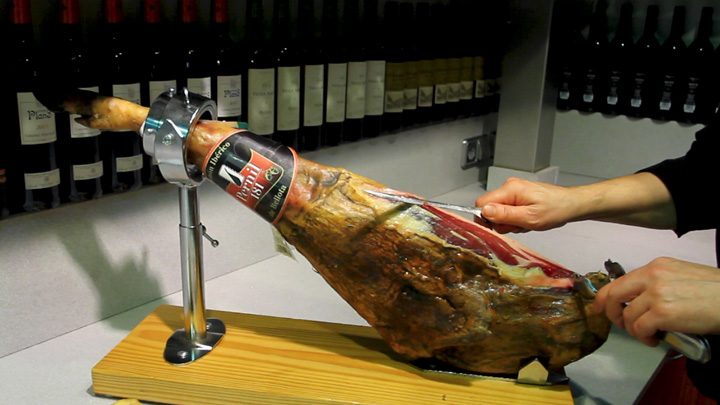
Slicing ham is not a simple mechanical act; it’s a ritual. It’s the moment when an exceptional product, slowly matured for years in our Jamonarium cellars, releases its full aromatic and flavor potential. Poor slicing technique not only ruins the ham’s appearance but can also alter the perception of its taste, texture, and juiciness.
Many Iberian ham lovers feel intimidated by a whole ham. «What if I ruin it?», «How do I even begin?», «What knives do I need?». If you’ve asked yourself these questions, this guide is for you. You’ll learn how to carve ham at home, step by step, with the confidence and technique of a master carver. Get ready to transform your kitchen into a temple of flavor.
1. The Essential Tools: Your Ham Carving Kit
Before you even approach the ham, you need the right equipment. Using the correct tools isn’t a luxury; it’s a matter of safety and precision. Don’t try to slice ham with generic kitchen knives; the result will be frustrating and dangerous.
The Ham Knife : Your Best Friend
This is the most important tool. The ham knife should be long (approximately 30 cm), narrow, and, crucially, flexible. This flexibility allows it to adapt to the shape of the ham and navigate around the bones. The edge must be extremely sharp. Remember: a sharp knife is safer than a dull one, as it requires less pressure to cut.
The Sharpening Steel : Maintaining the Perfect Edge
The honing steel (or sharpening steel) is an indispensable accessory for a ham knife. It’s not used to sharpen the knife (that’s done with a whetstone), but rather to hone the edge . During slicing, the edge wears down imperceptibly; running the knife along the honing steel aligns the teeth of the blade, ensuring clean, thin slices.
The Ham Holder (or Stand): Stability is Key
A good ham holder is the foundation of everything. It should be sturdy, heavy, and stable. The stand holds the ham firmly in place, preventing it from moving while you cut, which is the main cause of accidents. There are horizontal ham holders (the most common) and vertical ones. For home use, a stable ham holder with a good system for securing the hoof and the tip is sufficient. If you cut frequently, models with a rotating head make the job much easier by allowing you to turn the ham without disassembling it.
Cleaning knives (boning knife) and tweezers
For the preparation phase, you’ll need a short, rigid, and sharp-tipped knife, known as a boning knife or paring knife. It’s used to remove the rind, the yellow fat, and to score the bones. Finally, stainless steel tongs are useful for removing the slices without touching them with your hands, maintaining hygiene and presentation.
2. Preparing the Ham: Cleaning and Positioning
Proper preparation of the piece is half the battle.
How to Place the Ham in the Ham Holder
The position of the ham depends on how quickly you are going to eat it.
- If you’re going to eat it quickly (within 1-2 days): Place the ham with the hoof facing upwards. Start with the » maza ,» the widest, juiciest part with the most marbling. This is the easiest part for the initial slicing.
- If you plan to consume it slowly (over several weeks): It’s best to place it with the hoof facing down. Start with the shank (or rump ), the narrowest and leanest part, which dries out faster. This way, you’ll save the juiciest part for last.
The First Golden Rule: Cleaning the Ham
Before cutting the first edible slice, you must perform the «cleaning.» Iberian ham is protected by an outer layer of rind and yellow fat that has oxidized during the curing process. This part has a rancid and bitter taste that should not end up on your plate.
Using a boning knife, remove the tough rind and yellowish fat only from the area you plan to cut in that session . Make a deep cut around the hoof (the «shank») to make it easier to start cutting. The exposed surface should show the white or pink fat and the bright red meat. Don’t clean the entire ham at once , as the rind protects the meat and prevents it from drying out.
3. Step-by-Step Cutting Technique: Your First Ham Platter
Now the ritual begins. Patience is your best ally.
Step 1: The Initiation Cut (Knuckle)
Once the first section is clean, use the ham knife to make the initial cut. The first cut should be parallel to the shank bone. The slice will be thick and not very aesthetically pleasing, but it paves the way.
Step 2: Cutting the Master Slices
This is the essence of how to cut ham . The perfect slice should be almost translucent, very thin (between 1 and 2 mm), and approximately the size of an oyster (about 4-6 cm). It should contain a portion of red meat and a vein of intramuscular fat.
- Technique: Keep the ham knife parallel to the ham. The movement should be smooth, continuous, and a light zigzag (as if you were sawing). Don’t press the knife down; let the edge and flexibility of the knife do the work. Your free hand (the one not holding the knife) should always be behind or above the cutting line, never in front. Use the tongs to gently remove the slice.
- Direction: Always cut towards you or away from the hoof, maintaining a flat, horizontal cutting surface. Avoid making curves or digging into the piece. A flat surface ensures even consumption.
Step 3: Cutting the Different Parts of the Ham (Crane, Shank, Tip)
- The Maza: This is the main part. The slices are large, uniform, and with the Iberian fat at its peak. Enjoy the unctuousness that melts in your mouth.
- The Babilla: It is narrower and the cut is more laborious. The slices are smaller but very intense.
- The Tip: Located at the opposite end from the hoof, this is a very flavorful area with good fat content. To cut it, you may need to adjust the ham’s tilt or change your angle.
- The Hip Bone: You’ll find this bone while cutting the rump. When you reach it, use the boning knife to make a clean cut around the bone . This will allow subsequent slices of meat to peel away cleanly without hitting the bone.
Step 4: Overcoming Obstacles: The Bones
The bones (femur, patella) will appear. When the shank or knuckle is gone, don’t try to force the cut around the femur. This is the time to make crosswise cuts or «small cubes» from the difficult areas so as not to waste anything. Remember that Jamonarium bones are excellent for adding flavor to broths and stews.
4. Safety Tips When Cutting Ham
Safety is paramount. A haircut should be a pleasure, not a risk.
- Keep your free hand safe: This is the most important rule. The hand not holding the knife should always be in a safe position, ideally using tongs or placing it above the cutting line. Never put it in front of the blade.
- Sharp knives: A sharp knife cuts easily and requires less force, reducing the risk of dangerous slips.
- Stable ham holder: Make sure the stand doesn’t move.
- Cut away from the body: Whenever possible, cut away from your body. If the technique requires you to cut towards yourself, do so with extreme caution and control.
5. Maintenance and Conservation After Cutting
Once you have finished your cutting session, it is crucial to protect the piece so that it does not lose quality.
- Protect the exposed surface: Use the first thick strips of rind and white fat you removed during the initial cleaning to cover the cut area. This acts as a «natural lid» that retains moisture and prevents rancidity.
- Cover with a cloth: In addition to removing the fat, cover the entire ham with a clean, opaque cotton or linen cloth. This protects it from direct light and dust, allowing the ham to «breathe.»
- Storage: Keep the ham in a cool, dry, and dark place (such as a pantry), away from heat sources and strong odors. The ideal storage temperature is around 15-20°C.
- Re-cleaning : In the next cutting session, if the fat covering the piece has turned yellow or rancid, remove it before slicing for consumption.
Conclusion: Practice Makes Perfect
Learning to slice ham like a pro takes practice. Your first slices might not be perfect, but with time you’ll develop the steady hand, confidence, and technique needed to get the most out of every Jamonarium ham. Remember that the quality of our acorn-fed Iberian ham will make your job easier, offering a fat marbling that allows for smoother, more flavorful cuts. Enjoy the process and, above all, the unmistakable taste of fine Iberian ham!
 Español
 Català
  English
 Français
 Deutsch
 Italiano
 Dutch
Dutch